High dynamic range imaging
From Wikipedia, the free encyclopaedia
In image processing, computer graphics, and photography, high dynamic range imaging (HDRI or just HDR) is a set of techniques that allow a greater dynamic range of luminances between the lightest and darkest areas of an image than standard digital imaging techniques or photographic methods. This wider dynamic range allows HDR images to represent more accurately the wide range of intensity levels found in real scenes ranging from direct sunlight to faint starlight.
The two main sources of HDR imagery are computer renderings and merging of multiple photographs, which in turn are known as low dynamic range (LDR) or standard dynamic range (SDR) images. Tone mapping techniques, which reduce overall contrast to facilitate display of HDR images on devices with lower dynamic range, can be applied to produce images with preserved or exaggerated local contrast for artistic effect.
Well that was easier than try to explain what it means, but what does the technique offer to a photographer. Well first let me explain how I create my images; I take a single raw file and pass it through photomatix, I then take the resulting HDR image and edit it in lightroom and Photoshop till I get the look I want. This means that for me there is only one extra step to get this look and the good part is that the best images for this are flat dull ones, just the sort of photos that you take because it looks so good at the time but nothing when you get them home, of which I have 100’s.
The resulting image, at its best, has a painted quality where all the detail is visible, great for buildings and complex scenes, and given that the images were not really usable in their original form, even better for me.
Now some people don’t like this technique, they don’t think they are real photos, but what is a real photo, I take raw images with my camera, resulting in a 10mb file, after they have been converted to a real photo, a jpeg, the file size is around 4mb, just what have I lost in that 6mb? This technique does not add anything that was not there already, it just was not visible in the normal image, although you would have been able to see it when you were looking at the scene and maybe that’s why some photos don’t seem to look like we thought they should.
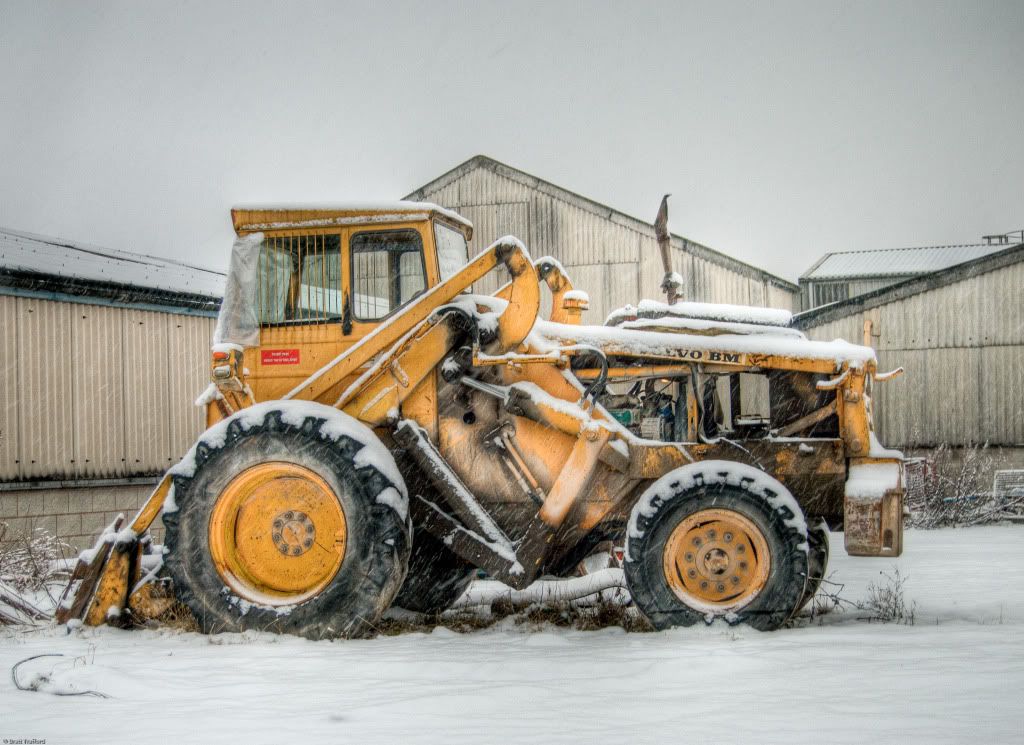
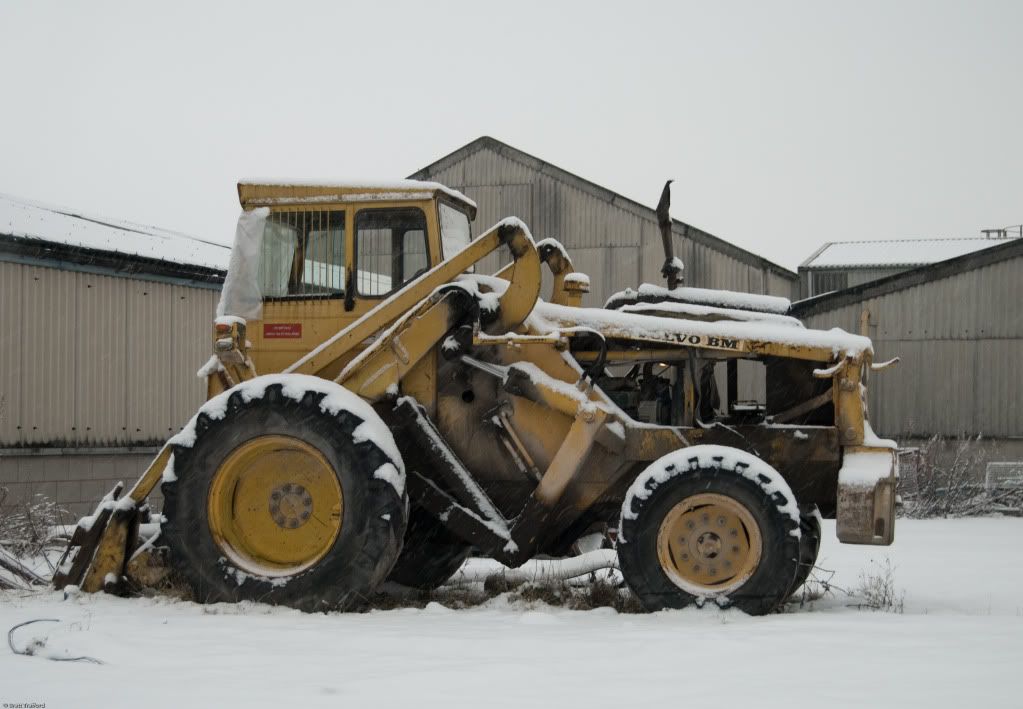
This shot is of a large tractor on our local cement works, taken while it was snowing on a very cold gray day. At the time I thought it was a great study full of textures and colour, but the original file was gray and flat, if I added contrast I lost the detail in the snow, if I lightened the image I lost the detail in the ground and sky, if I darkened the image to get more sky detail, I lost detail on the tractor, the image was a complete loss and no chance of getting a second go. With HDR the shot has that detail and colour that I saw when I took it, here are both shots the top is the HDR just in case you can not tell. Click on each image to get a full view.
----------------
Now playing: The Rolling Stones - Paint It Black
via FoxyTunes
In image processing, computer graphics, and photography, high dynamic range imaging (HDRI or just HDR) is a set of techniques that allow a greater dynamic range of luminances between the lightest and darkest areas of an image than standard digital imaging techniques or photographic methods. This wider dynamic range allows HDR images to represent more accurately the wide range of intensity levels found in real scenes ranging from direct sunlight to faint starlight.
The two main sources of HDR imagery are computer renderings and merging of multiple photographs, which in turn are known as low dynamic range (LDR) or standard dynamic range (SDR) images. Tone mapping techniques, which reduce overall contrast to facilitate display of HDR images on devices with lower dynamic range, can be applied to produce images with preserved or exaggerated local contrast for artistic effect.
Well that was easier than try to explain what it means, but what does the technique offer to a photographer. Well first let me explain how I create my images; I take a single raw file and pass it through photomatix, I then take the resulting HDR image and edit it in lightroom and Photoshop till I get the look I want. This means that for me there is only one extra step to get this look and the good part is that the best images for this are flat dull ones, just the sort of photos that you take because it looks so good at the time but nothing when you get them home, of which I have 100’s.
The resulting image, at its best, has a painted quality where all the detail is visible, great for buildings and complex scenes, and given that the images were not really usable in their original form, even better for me.
Now some people don’t like this technique, they don’t think they are real photos, but what is a real photo, I take raw images with my camera, resulting in a 10mb file, after they have been converted to a real photo, a jpeg, the file size is around 4mb, just what have I lost in that 6mb? This technique does not add anything that was not there already, it just was not visible in the normal image, although you would have been able to see it when you were looking at the scene and maybe that’s why some photos don’t seem to look like we thought they should.
This shot is of a large tractor on our local cement works, taken while it was snowing on a very cold gray day. At the time I thought it was a great study full of textures and colour, but the original file was gray and flat, if I added contrast I lost the detail in the snow, if I lightened the image I lost the detail in the ground and sky, if I darkened the image to get more sky detail, I lost detail on the tractor, the image was a complete loss and no chance of getting a second go. With HDR the shot has that detail and colour that I saw when I took it, here are both shots the top is the HDR just in case you can not tell. Click on each image to get a full view.
----------------
Now playing: The Rolling Stones - Paint It Black
via FoxyTunes


Comments
Dan
Sandi